Apple의 CodeSigning에서 설명한 글에 이어,
앞서 설명한 iOS 앱 개발 및 배포 과정에 있어 불편함을 최소화 및
CI/CD를 적용을 위해 공부한 부분을 글로 남깁니다.
CI/CD란?
→ Application의 개발 단계를 자동화하여 보다 짧은 주기로 고객에게 제공하는 방법
→ 새로운 코드 통합으로 인해 개발 및 운영팀에 발생하는 문제(일명 "Integration Hell")을 해결하기 위한 솔루션

Integration Hell: 코드 통합 단계에 있어서 그 과정이 매끄럽지 못해 최종적으로 코드를 통합하고 수정하는데 있어 오랜 시간이 걸리는 현상을 의미합니다.
CI(Continous Integration): 지속적인 통합
- 통합 프로세스를 지속적으로 실시
- 코드는 주기적으로 변형 및 통합
- 코드는 통합되기 전 항상 테스트되어야 한다.
CI의 목표 →
- 애플리케이션에 대한 새로운 코드 변경 사항이 정기적으로 빌드 및 테스트
CD(Continous Delivery / Continous Deploy): 지속적인 제공
Continuous Delivery
- 앱에 적용한 변경사항이 버그 테스트를 거쳐 레포에 자동으로 업로드
- 운영팀은 이 레포에서 애플리케이션을 실시간 프로덕션 환경으로 배포
Continuous Deploy:
- 프로덕션 환경으로 배포작업을 자동화
- 개발자의 변경 사항을 리포지토리에서 고객이 사용 가능한 프로덕션 환경까지 자동으로 릴리스하는 것을 의미
→ 두 가지 의미 모두 파이프라인의 추가 단계에 대한 자동화를 뜻하지만 때로는 얼마나 많은 자동화가 이루어지고 있는지를 설명하기 위해 별도로 사용되기도 합니다.
CD의 목표 →
- 개발팀과 비즈니스팀 간의 가시성과 커뮤니케이션 부족 문제를 해결
- 최소한의 노력으로 새로운 코드를 배포
출처: https://www.redhat.com/ko/topics/devops/what-is-ci-cd
iOS의 CI/CD 구현
이전 "Apple의 Codesiging" 글에서 언급했듯이 iOS 앱 배포를 위해 가장 까다로운 작업은 Codesiging 부분입니다.
일반적인 배포 절차를 살펴봅시다.
- 개발을 위한 CodeSiging 검증
- 코드 작성 및 테스트
- 코드 통합
- 코드 테스트
- 빌드 파일 생성(Archeive)
- 배포를 위한 CodeSiging 검증
- AppStoreConnect 업로드(TestFlight)
개발을 시작하기 전 Apple로 부터 개발자 인증을 받기위해 Development와 Distribution 인증서를 생성하였을 것입니다.
신뢰하는 기기를 포함한 각각 개발용/ 배포용 프로필을 생성 후 코드를 생성합니다.
코드 작성이 완료되고 테스트가 완료되었다면,
Xcode의 인터페이스에서 빌드 파일을 생성하고,
배포를 위해 배포용 인증서와 프로필을 선택해줍니다.
배포가 완료된 후 App Store Connect에 접속하여 빌드가 성공적으로 업로드 되었는지 확인합니다.
위와 같이 배포 시 항상 해당 프로필을 지정해주고,
하나의 단계가 마무리될때마다 정상적으로 마무리 되었는지 확인하고 대기해야합니다.
이러한 불편한 점을 개선하기 위해 Fastlane + Jenkins의 조합으로,
코드가 테스트 된 시점에서 코드 통합 시 테스트 + 배포 자동화를 목표로 하였습니다.
Fastlane이란?
fastlane is the easiest way to automate beta deployments and releases for your iOS and Android apps.
🚀 It handles all tedious tasks, like generating screenshots, dealing with code signing, and releasing your application.
출처: https://docs.fastlane.tools/
- ruby 기반 클라이언트 자동 빌드 오픈소스 라이브러리
- iOS 앱을 개발하면서 필요한 모든 귀찮은일 (인증서관리, 배포, 테스트) 등을 자동화 시켜주는 도구
그래서 Fastlane의 역활은?
스크린샷 자동화 ( AUTOMATE SCREENSHOTS )
앱 서명 / 인증서 관리 (CODE SIGNING)
배포 자동화 ( BETA DEVELOPMENT)
앱스토어 배포 자동화 (APPSTORE DEVELOPMENT)
위와 같이 다양한 기능들을 지원하며, 차례대로
스토어 배포를 위한 스크린샷 자동화
배포를 위한 CodeSiging의 자동화
테스트플라이트 앱 배포의 자동화
스토어 앱 배포의 자동화
를 의미하며, 우선 Code Siging과 테스트플라이트 앱 배포의 자동화에 초점을 맞추어 진행하겠습니다.
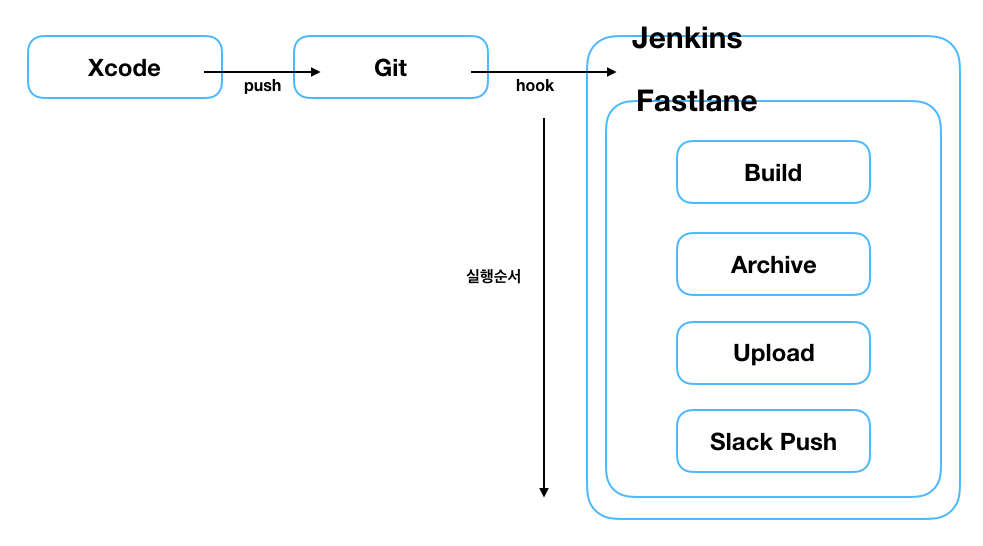
iOS 앱 배포 자동화의 구현을 위해 위와 같은 프로세스를 목표로 했으며, 목표를 3단계로 나누었습니다.
- 로컬에 Fastlane 설치 및 fastlane 명령어를 통해 TestFlight 업로드
- 로컬에 Jenkins 설치 + iOS 빌드 환경 성정 후 fastlane과 연동, Jenkins 빌드를 통해 TestFlight 업로드
- AWS 인스턴스에 Jenkins 및 Fastlane 설치 후 Bitbucket webhook을 통해 TestFlight 업로드
Fastlane Setup
https://docs.fastlane.tools/getting-started/ios/setup/
(1) xcode command line Tool 설치
xcode-select --install(2) Fastlane 설치
- Ruby와 Ruby Package Manager인 Bundler를 사용해 설치하는 방법
- Homebrew를 사용하는 방법(Ruby 별도 설치 필요X)
2번 방법으로 진행하였습니다.
brew install fastlane
(3) Fastlane 초기화
fastlane init
fastlane을 생성 시 다음과 같은 CLI가 노출됩니다.
2번, 3번 선택 시 개발자 계정 로그인을 위해 아이디와 비밀번호를 물어보며, 이중인증까지 진행할 것 입니다.
매뉴얼 세팅을 위해 4.를 선택 후 진행하였습니다.

fastlane 생성이 완료되면 위와 같이 Gemfile, Gemfile.lock, fastlane/Appfile, fastlane/Fastfile 이렇게 4개의 파일이 생성됩니다.
Gemfile과 Gemfile.lock의 경우 Fastlane의 버전 및 Dependency 관리를 위한 존재로 Podfile과 같이 생각하면됩니다.
Appfile - 프로젝트 fastlane 적용 시 필요한 credentials를 포함하는 파일
Fastfile - fastlane 명령어 실행 시 돌아갈 fastlane 스크립트 파일
⚠️ .gitignore 작성 시 Appfile과 Fastfile을 포함하여야 합니다.
Appfile의 경우 app password와 같은 정보를 포함함으로 dotenv로 관리합니다.
(3) Appfile에 Credential 정보를 입력합니다 → dotenv 관리.
app_identifier(ENV["APP_BUNDLE_ID"]) # The bundle identifier of your app
apple_id(ENV["APPLE_ID"]) # Your Apple email address
team_id(ENV["APPLE_TEAM_ID"]) #Apple Team ID
itc_team_name(ENV["ITC_TEAM_NAME"]) #Apple Team Name

# For more information about the Appfile, see:
# https://docs.fastlane.tools/advanced/#appfile
(4) Apple Service Authentication (애플 서비스 인증)
https://docs.fastlane.tools/getting-started/ios/authentication/
fastlane을 통해 TestFlight 및 Store 업로드 시
- App Store Connect API Key (App Store Connect로 부터 발급받은 API 키) - recommended
- 2FA or 2SV(2Factor Authenticate or 2Step Verification)
중 하나의 인증 절차가 필요합니다.
1.의 경우 App Store Connect 접속 후 API 키를 발급받아(p8 파일 포함) 인증합니다.
Fastfile
app_store_connect_api_key(
 key_id: ENV["KEY_ID"],
 issuer_id: ENV["ISSUER_ID"],
 key_filepath: "./AuthKey_4JCPP2Z847.p8"
)
2.의 경우 AppleId.apple.com에서 앱 암호 생성 합니다.
해당 키를 env에 기입해줍니다.
FASTLANE_APPLE_APPLICATION_SPECIFIC_PASSWORD="abcd-efgh-ijkl-mnop"(5)Fastlane의 CodeSiging
Cert, Sigh
- Cert: Fastlane 초기화 시 입력한 Apple 계정을 토대로 로컬 키체인에서 해당 인증서를 찾아서 적용
- 인증서가 존재하지 않는 경우 자동으로 생성(optional)
- Sigh: Apple 계정에서 프로파일을 검색 및 다운받아 적용
- 프로파일이 없는 경우 자동으로 생성 가능(optional)
- 인증서가 만료 된 모든 개발자가 인증서를 갱신
Match
- 하나의 인증서를 private repo에 저장
- 허가된 팀원들이 해당 저장소에 접근
- 저장소에 올리는 모든 파일을 암호화
Cert/Sigh 방식과 Match 방식을 모두 적용해 보았습니다.
Match의 경우 Git/ Cloud / AWS 들 private 원격 저장소에 공통 인증서를 저장하여 사용하는 방식으로
만료 시 인증서 및 프로파일 갱신을 한번만 진행하면 된다는 편리함이 있지만,
별도의 저장 스토리지를 설정 및 관리해 주어야합니다.
Cert/Sigh 방식의 경우 로컬 키체인으로 부터 필요한 인증서 / 프로파일을 찾아서 적용해주며(필요시 생성),
별도의 저장 스토리지 생성 없이 로컬에서 필요한 정보를 찾아주기 때문에 간편하지만,
인증서 만료시 모든 개발자가 로컬의 인증서를 갱신 해 주어야합니다.
https://docs.fastlane.tools/codesigning/getting-started/
Getting Started - fastlane docs
New to fastlane? Click here to open the installation & setup instructions first xcode-select --install # Using RubyGems sudo gem install fastlane -NV # Alternatively using Homebrew brew install fastlane fastlane init More Details Codesigning concepts If yo
docs.fastlane.tools
Cert/Sigh 방식 기준
fastlane certfastlane sigh를 통해 Cert와 Sigh를 설치 후
lane :beta do
  get_certificates           # invokes cert
  get_provisioning_profile   # invokes sigh
  build_app
end
위와 같이 적용하게 되면 해당 프로젝트를 위한 인증서와 프로필을 찾아 적용시킵니다.
Match 방식
Match의 type
- development
- appstore
- ad-hoc
- enterprise
Match적용을 위해
- 공용 인증서 + 프로파일 저장을 위한 Private 저장소 생성
- 기존 인증서 삭제(인증서가 쌓이는 것을 막기 위해) → 선택사항
- Match 명령어를 통해 공용 인증서 생성 및 저장소 저장
fastlane match init
생성한 저장소를 입력해줍니다. 저는 git private repo를 선택하였으며,
현재 bitbucket의 imf-app-auth private repository에 인증서를 저장해 놓았습니다.

설정이 완료되었다면, 다음과 같이 Matchfile이 생성됩니다.
Matchfile은 키를 저장하기 위한 스토리지 url과 타입, Match의 기본타입이 명시되어 있습니다.
Match를 사용하기 전에 기존 인증정보를 깔끔하게 지워주겠습니다.(Push 인증서는 지우지 않습니다) → 선택사항
fastlane match nuke development                 #개발 인증서 및 프로파일 삭제
fastlane match nuke distribution                #배포 인증서 및 프로파일 삭제
이제 Match에서 사용할 인증서와 프로파일을 생성하겠습니다.
fastlane match development                      #개발 인증서 및 프로파일 생성
fastlane match appstore                             #배포 인증서 및 프로파일 생성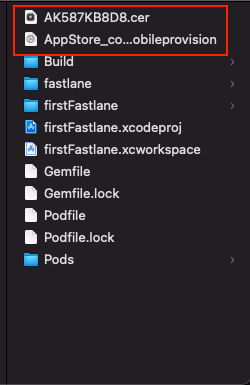
인증 정보 생성이 완료 되면 다음과 같이 인증서와 프로파일이 해당 경로에 위치하게 됩니다.
또한 로컬 키체인에도 해당 정보가 자동으로 등록됩니다.
위 과정이 완료 되었다면 fastlane을 통해 TestFlight 앱을 배포할 준비가 되었습니다.
아래 코드는 애플 서비스 인증의 경우 2FA 인증 (env에 해당 값 저장)
(6) Fastfile 작성
Fastfile 명령어 doc
https://docs.fastlane.tools/actions/
Available Actions - fastlane docs
<!-- This file is auto-generated and will be re-generated every time the docs are updated. To modify it, go to its source at https://github.com/fastlane/fastlane/blob/master/fastlane/lib/assets/Actions.md.erb --> New to fastlane? Click here to open the ins
docs.fastlane.tools
cert/sigh 방식 적용
# This file contains the fastlane.tools configuration
# You can find the documentation at https://docs.fastlane.tools
#
# For a list of all available actions, check out
#
#     https://docs.fastlane.tools/actions
#
# For a list of all available plugins, check out
#
#     https://docs.fastlane.tools/plugins/available-plugins
#

# Uncomment the line if you want fastlane to automatically update itself
# update_fastlane

default_platform(:ios)

  desc "Install Pod Dependenies"
  lane :install_pods do
    fastlane_dir = %x(pwd)
        absolute_path = Pathname.new(File.expand_path(fastlane_dir)).parent

            cocoapods(
                podfile: "#{absolute_path}/Podfile",
                use_bundle_exec: false
                )
  end

    desc "Increment Build Number"
      lane :increment_build do
        increment_build_number(
                build_number: latest_testflight_build_number + 1
            )
  end

  desc "Archeive and Build IPA"
  lane :tf  do
  version = get_version_number
  install_pods

  get_certificates                                                      # 인증서
  get_provisioning_profile                                              # 프로파일

  increment_build                                                       # 빌드 넘버 증가

    build_app(                                                          # 빌드 및 IPA 생성
            workspace: "firstFastlane.xcworkspace",
            scheme:"firstFastlane",
            output_directory: "./Build/",
            output_name: "firstFastlane(#{get_version_number})",
            export_method: "app-store",
            clean: true
        )

    upload_to_testflight                                                # 테스트 플라이트 업로드

    slack(                                                              # 슬랙 WebHook (성공 시)
        message: "Test App 배포에 성공하였습니다.",
        success: true,
        slack_url: ENV["SLACK_WEBHOOK_URL"],
        payload: {
            "Version": version
        }
    )
  end

                                                                        # 슬랙 WebHook (에러 발생 시)
  error do |lane, exception, options|
    version = get_version_number
        slack(
            message: "Test App 배포 중 에러가 발생했습니다.",
            success: false,
            slack_url: ENV["SLACK_WEBHOOK_URL"],
            payload: {
                "Version": version,
                "Error": exception
            }
        )
    end

end
Match 방식 적용
# This file contains the fastlane.tools configuration
# You can find the documentation at https://docs.fastlane.tools
#
# For a list of all available actions, check out
#
#     https://docs.fastlane.tools/actions
#
# For a list of all available plugins, check out
#
#     https://docs.fastlane.tools/plugins/available-plugins
#

# Uncomment the line if you want fastlane to automatically update itself
# update_fastlane

default_platform(:ios)

    private_lane :renew_codesign do|options|                            # match 갱신 - git에 push (certificate, profile visioning)
        match(type:options[:type], force_for_new_devices: true)
    end

    lane :renew_codesign_debug do
        renew_codesign(type:"development")
    end

    lane :renew_codesign_beta do
        renew_codesign(type:"adhoc")
    end

    lane :renew_codesign_release do
        renew_codesign(type:"appstore")
    end


    private_lane :sync_codesign do|options|                             # match 로드 (certificate, profile visioning)
        match(type:options[:type], readonly: true)
    end

    lane :sync_codesign_debug do
        sync_codesign(type:"development")
    end

    lane :sync_codesign_beta do
        sync_codesign(type:"adhoc")
    end

    lane :sync_codesign_release do
        sync_codesign(type:"appstore")
    end

  desc "Install Pod Dependenies"
  lane :install_pods do
    fastlane_dir = %x(pwd)
        absolute_path = Pathname.new(File.expand_path(fastlane_dir)).parent

            cocoapods(
                podfile: "#{absolute_path}/Podfile",
                use_bundle_exec: false
                )
  end

    desc "Increment Build Number"
      lane :increment_build do
        increment_build_number(
                build_number: latest_testflight_build_number + 1
            )
  end

  desc "Archeive and Build IPA"
  lane :tf  do
  version = get_version_number

  sync_codesign_debug
  # sync_codesign_beta
  sync_codesign_release
  install_pods

  increment_build                                                       # 빌드 넘버 증가

    build_app(                                                          # 빌드 및 IPA 생성
            workspace: "firstFastlane.xcworkspace",
            scheme:"firstFastlane",
            output_directory: "./Build/",
            output_name: "firstFastlane(#{get_version_number})",
            export_method: "app-store",
            clean: true
        )

    upload_to_testflight                                                # 테스트 플라이트 업로드

    slack(                                                              # 슬랙 WebHook (성공 시)
        message: "Test App 배포에 성공하였습니다.",
        success: true,
        slack_url: ENV["SLACK_WEBHOOK_URL"],
        payload: {
            "Version": version
        }
    )
  end

                                                                        # 슬랙 WebHook (에러 발생 시)
  error do |lane, exception, options|
    version = get_version_number
        slack(
            message: "Test App 배포 중 에러가 발생했습니다.",
            success: false,
            slack_url: ENV["SLACK_WEBHOOK_URL"],
            payload: {
                "Version": version,
                "Error": exception
            }
        )
    end

end
해당 코드를 Fastfile에 작성 후
fastlane lane명 입력 시 해당 lane의 스크립가 작동합니다.
1차 목표인 로컬에서 Fastlane 설치 후 fastlane script를 통해 TestFlight 업로드에 성공했다.
2차 목표인 로컬에 Jenkins 설치 후 Jenkins 빌드 시 TestFlight 업로드가 되도록 설정해 보곘습니다.
Ruby 설정
(1) RVM 설치
sudo gpg2 --recv-keys 409B6B1796C275462A1703113804BB82D39DC0E3 7D2BAF1CF37B13E2069D6956105BD0E739499BDB
\curl -sSL https://get.rvm.io | bash
source /home/ec2-user/.rvm/scripts/rvm
(2) Ruby 설치
rvm install "ruby-2.6.0"
rvm use 2.6.0
Jenkins 설정
(1) Jenkins 설치
brew install jenkins(2) Java 버전 1.8로 설정(Fastlane 실행을 위해 Ruby Runtime 플러그인이 필요한데 Java 1.8까지만 지원합니다.)
brew tap AdoptOpenJDK/openjdk
brew install --cask adoptopenjdk8
- .zshrc 환경변수 설정
export JAVA_HOME=$(/usr/libexec/java_home -v1.8)source ~/.zshrcbrew services restart jenkins
(3) Jenkins InitialPassword 입력 → 유저 설정 → Jenkins 설치 완료
(4) Jenkins 관리 → 시스템 설정 → Global Properties 설정
FASTLANE_APPLE_APPLICATION_SPECIFIC_PASSWORD // 앱 암호FASTLANE_PASSWORD // Developer Account 비밀번호(5) 프로젝트 생성
- 새로운 아이템 → Freestyle project
- git repo 연결 및 credential 추가

(6) 플러그인 설치

(7) Ruby Runtime 설정 및 Build Script 추가

빌드 시 Jenkins workspace에
/.jenkins/lib/workspace/프로젝트명해당 프로젝트 경로가 생성됩니다.
⚠️ 해당 프로젝트 아래 fastlane 경로 아래에 이전에 설정한 .env 파일을 옮겨 주어야 합니다.
빌드가 성공하면 로컬 Jenkins와 Fastlane의 설정이 완료되었고 TestFlight에 업로드 되게 됩니다.
2차 목표인 로컬에 Jenkins 설치 후 Jenkins 빌드 시 TestFlight 업로드에 성공하였습니다.
최종 목표인 "AWS 인스턴스에 Jenkins 및 Fastlane 설치 후 Bitbucket webhook을 통해 TestFlight 업로드"
를 구현하기 위해 노력하였으나,
- AWS 인스턴스는 linux 기반으로 실행되고, macOS 인스턴스 생성 시 드는 비용이 너무 크다.
- Fastlane은 Ruby Runtime에서 실행됨으로 fastlane 명령어는 인식하지만, project 빌드 시 필요한 xcode command line은 macOS에서만 설치가 된다.
- 빌드가 되지 않으므로, Jenkins를 리눅스 기반 인스턴스에 설정하는것은 무의미합니다.
최종 목표
로컬 8080포트를 ngrok을 사용하여 외부에 공개하였고,
부여받은 Domain으로 Bitbucket WebHook을 설정하였습니다.
(1) Ngrok를 사용하여 IP 공개
- ngrok 가입 및 로그인
- ngrok 다운
- 설치 및 authToken 설정(authToken은 ngrok 웹에서 확인)
-
unzip ngrok-stable-darwin-amd64.zip./ngrok authtoken 인증토큰./ngrok http 8080
- 입력 시 포워딩 된 주소를 받는다. → 해당 주소로 Jenkins 접속
(2) Jenkins Bitbucket Plugin 설치


(3) Bitbucket 접속 후 Webhook 설정

(4) 해당 Bitbucket Repository에 Push
- Bitbucket Push 성공
- Webhook을 따라 Jenkins Build 실행
- Jenkins 빌드에 따라 로컬 fastlane 실행
- Fastlane Match를 통해 인증정보를 매칭, 테스트플라이트에 업로드
최초 그려봤던 그림과 일치합니다.

이상으로 iOS CI/CD 구현 및 Fastlane과 Jenkins를 활용한 배포 자동화를 마치겠습니다.
'iOS' 카테고리의 다른 글
| FCM과 APNs에 관하여 (0) | 2022.05.03 |
|---|---|
| (동기/비동기)와 동시성에 대한 개념 (0) | 2021.12.21 |
| Apple 인증서 및 CodeSigning (0) | 2021.11.24 |

